Introduction
In today’s fast-paced, tech-powered world, a portable charger is a must-have. But what if you could make your own power bank using recycled batteries and a few basic components? This DIY tech project not only saves money but also helps the environment by reducing e-waste.
In this post, I’ll show you how to build a DIY power bank from old lithium batteries—step-by-step, using easy-to-find materials.
Why Build a DIY Power Bank?
Before we begin, here’s why this project is worth your time:
- ♻️ Eco-friendly – You reuse batteries that would otherwise end up as toxic waste.
- 💸 Cost-effective – Build one for less than half the price of store-bought power banks.
- 🛠️ Skill-building – Learn practical electronics and soldering.
- 🔋 Customizable – Choose your desired capacity and casing.
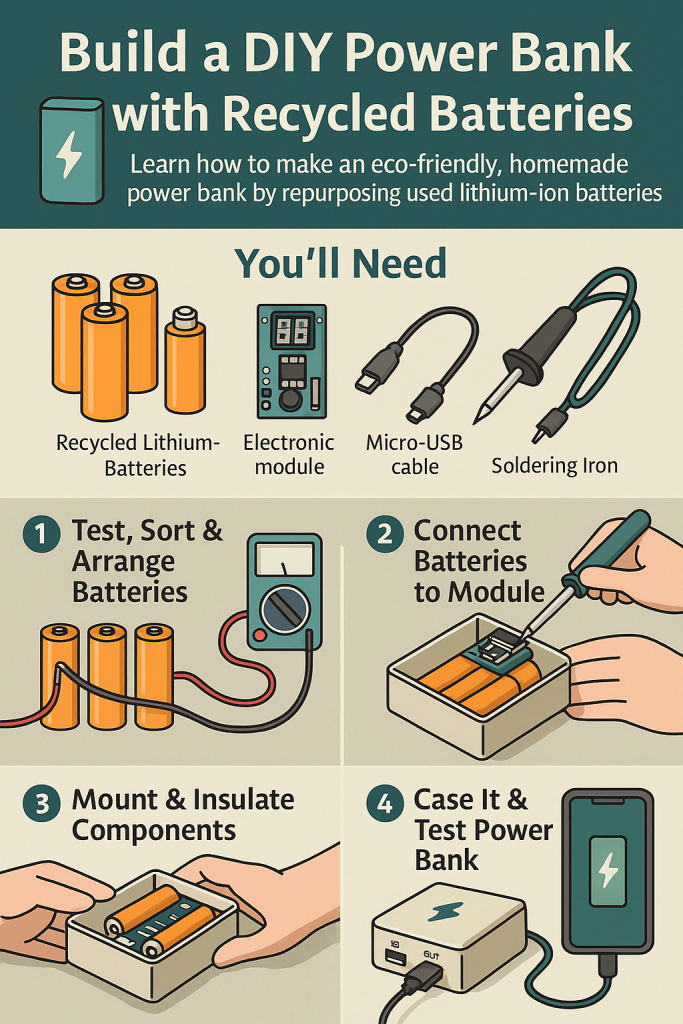
What You’ll Need
| Item | Description |
|---|---|
| 🔋 18650 Lithium-ion batteries | Recycled from old laptops or bought new |
| 🔌 Battery holder or case | Holds the 18650 cells |
| 🧠 TP4056 charging module | For safe charging and protection |
| 🔧 Boost converter (5V output) | Converts battery
|
| 🪛 Soldering iron & solder wire | For wiring components together |
| 📏 Multimeter | To test voltage and battery health |
| 🧰 Heat shrink or electrical tape | For insulation and and safety |
| 📦 Small project box | For housing your power bank |
Important Note: Make sure to test all recycled batteries using a multimeter. Avoid any cells that are swollen, hot, or leaking.
Step-by-Step Guide to Building Your DIY Power Bank
🔍 Step 1: Gather and Test Your Batteries
- Use a multimeter to check the voltage of each 18650 cell.
- Only use cells that are within 3.7V to 4.2V and show no signs of damage.
🧰 Step 2: Install Batteries in the Holder
- Place your selected batteries into the battery holder in the correct polarity (+/-).
- If using a custom case, secure the batteries with hot glue or a snug foam fit.
⚡ Step 3: Wire the Charging Module (TP4056)
- Solder the battery terminals to the B+ and B− pads on the TP4056 module.
- Be cautious about polarity—reversing it can damage your components.
🔌 Step 4: Attach the Boost Converter
- Connect the output from the TP4056 to the input of the boost converter.
- The converter will regulate voltage to 5V, suitable for USB output.
🔋 Step 5: Add the USB Port
- Most boost converters have a USB out. If not, solder a female USB port to the output terminals.
- This is where you’ll plug in your charging cable.
🧪 Step 6: Test the Setup
- Use a multimeter to confirm the output is steady at 5V.
- Plug in your phone or small device to test the charging function.
🧱 Step 7: Enclose in a Protective Case
- Neatly place everything inside your DIY casing or project box.
- Use tape or heat shrink tubes to insulate wires.
- Cut holes for USB ports and LED indicators.
Safety Tips ⚠️
- Never mix old and new batteries.
- Avoid overcharging — the TP4056 usually has built-in protection.
- Do not use damaged or leaking batteries.
- Always monitor your DIY power bank during its first few charges.
Bonus Tip 💡: Add a Battery Level Indicator
You can add a small battery level indicator module (often under $2) to see how much charge is left. It’s optional but adds polish to your project.
How Long Will It Last?
A recycled DIY power bank with 2–4 18650 cells can charge a smartphone 1 to 3 times depending on:
- The health of the batteries
- The output capacity (mAh)
- Energy loss during conversion
Common Mistakes to Avoid
- ❌ Not testing batteries before use
- ❌ Poor soldering (can cause short circuits)
- ❌ Overpacking the case (can crush components)
- ❌ Skipping safety modules (risk of fire)
Final Thoughts
Building your own DIY power bank is more than a cool project—it’s an eco-friendly statement and a rewarding hands-on experience.
Whether you’re a tech enthusiast, student, or someone who just loves practical DIY, this project ticks all the right boxes.
You save money, reduce e-waste, and walk away with a gadget you actually built yourself. 💪⚡
- ✅ Summary Checklist
| Task | Done? |
|---|---|
| Gather and test batteries ✅ | |
| Wire charging and boost modules ✅ | |
| Connect USB output ✅ | |
| Enclose in a safe case ✅ | |
| Test functionality ✅ |
Would You Try This?
Let us know in the comments 👇 or share your build with our tech DIY community!